Sales Compensation Software Benchmark | Compare 15+ sales compensation platforms (features, pricing, fit by company size...)
Download- QuickBooks Online cannot calculate commissions natively — you can only tag sales by salesperson (Classes or Locations) and must export data to compute payouts externally.
- Common manual workaround: enable Class Tracking, create a Class per rep, assign the Class on every sales transaction, export "Sales by Class" reports, calculate commissions in a spreadsheet, then record accruals (Debit: Commission Expense / Credit: Commissions Payable) and clear on payment.
- Manual method limits: highly time‑consuming, error‑prone (mis-tagging transactions), offers no real‑time visibility for reps, and doesn’t scale for tiered rates, accelerators, splits or high transaction volumes.
- Automated commission platforms integrate with CRM and QuickBooks to pull deals, apply no‑code commission rules, provide real‑time rep dashboards, and push approved journal entries back to QuickBooks — reducing errors and admin time dramatically.
- Choose by need: manual Class tracking suits very small teams with simple flat plans (1–3 reps); invest in an integrated automation tool when you need scalability, complex plans, real‑time transparency, and accurate sync to accounting/payroll.
Tired of manually calculating sales commissions and wrestling with spreadsheets each month? While QuickBooks is a powerhouse for your core accounting, you've likely discovered it lacks a built-in module for automatically calculating and managing sales commissions. This forces many finance and sales operations teams into a maze of manual tracking, reporting, and payment processes that are both time-consuming and prone to error.
The good news is that you can manage commission tracking within QuickBooks, but it requires choosing the right strategy. You can either use a manual workaround with its native features or integrate a dedicated platform to automate the entire process. This guide will walk you through both methods, helping you find the perfect workflow for your business.
The Core Challenge: Why QuickBooks Doesn't Calculate Commissions Natively
QuickBooks Online (QBO) is fundamentally an accounting software. Its primary job is to track revenue, expenses, assets, and liabilities to produce accurate financial statements. It excels at recording what has happened financially but wasn't designed to be a Sales Performance Management (SPM) tool.
This means that while you can record a sale and even tag it to a specific salesperson, QuickBooks does not have a native feature to:
- Apply different commission rates based on products, profit margins, or sales targets.
- Handle complex structures like tiered commissions, accelerators, or bonuses.
- Provide salespeople with real-time visibility into their potential earnings.
- Automate the payment and reconciliation process.
Therefore, any commission management done solely within QuickBooks will involve a manual workaround. Let's explore the most common method.
Method 1: Manual Commission Tracking Using QuickBooks Native Features
The most widely used workaround inside QuickBooks involves using its category tracking features—either "Class Tracking" or "Location Tracking"—to associate each transaction with a specific salesperson. This allows you to run reports on sales per rep, which you can then export to calculate commissions manually.
Step 1: Activate Class or Location Tracking
First, you need to enable one of these tracking features in your company settings.
- Click the Gear icon (⚙) in the top right corner.
- Select Account and settings.
- Navigate to the Advanced tab from the left-hand menu.
- Find the Categories section and click the pencil icon to edit it.
- Check the box for Track classes and/or Track locations.
- Click Save, then Done.
Choosing Between Class and Location Tracking
While you can use either feature, Class Tracking is generally the better choice for tracking salespeople. Location Tracking is designed for businesses with multiple physical stores, offices, or regions. If you already use Locations for this purpose, using it for salespeople can complicate your reporting. Classes are more flexible and can be used to segment your business in any way you choose, making them ideal for sales reps, departments, or service lines.
Step 2: Set Up Your Sales Reps as Classes
Once Class Tracking is enabled, you need to create a class for each member of your sales team.
- Go back to the Gear icon (⚙) and select All Lists.
- Choose Classes.
- Click New in the top right.
- Enter the salesperson's name as the Class Name (e.g., "Jane Smith").
- Click Save. Repeat this for every sales representative.
Step 3: Assign Sales to Reps on Each Transaction
This is the most critical—and most manual—part of the process. Every time you create a sales transaction (like an invoice or sales receipt), you must assign it to the correct salesperson using the Class dropdown menu that now appears on the form.
This step is where most errors occur. If the person entering invoices forgets to select a class or chooses the wrong one, your sales data will be inaccurate, leading to incorrect commission calculations and disputes.
Step 4: Generate Reports to See Sales by Rep
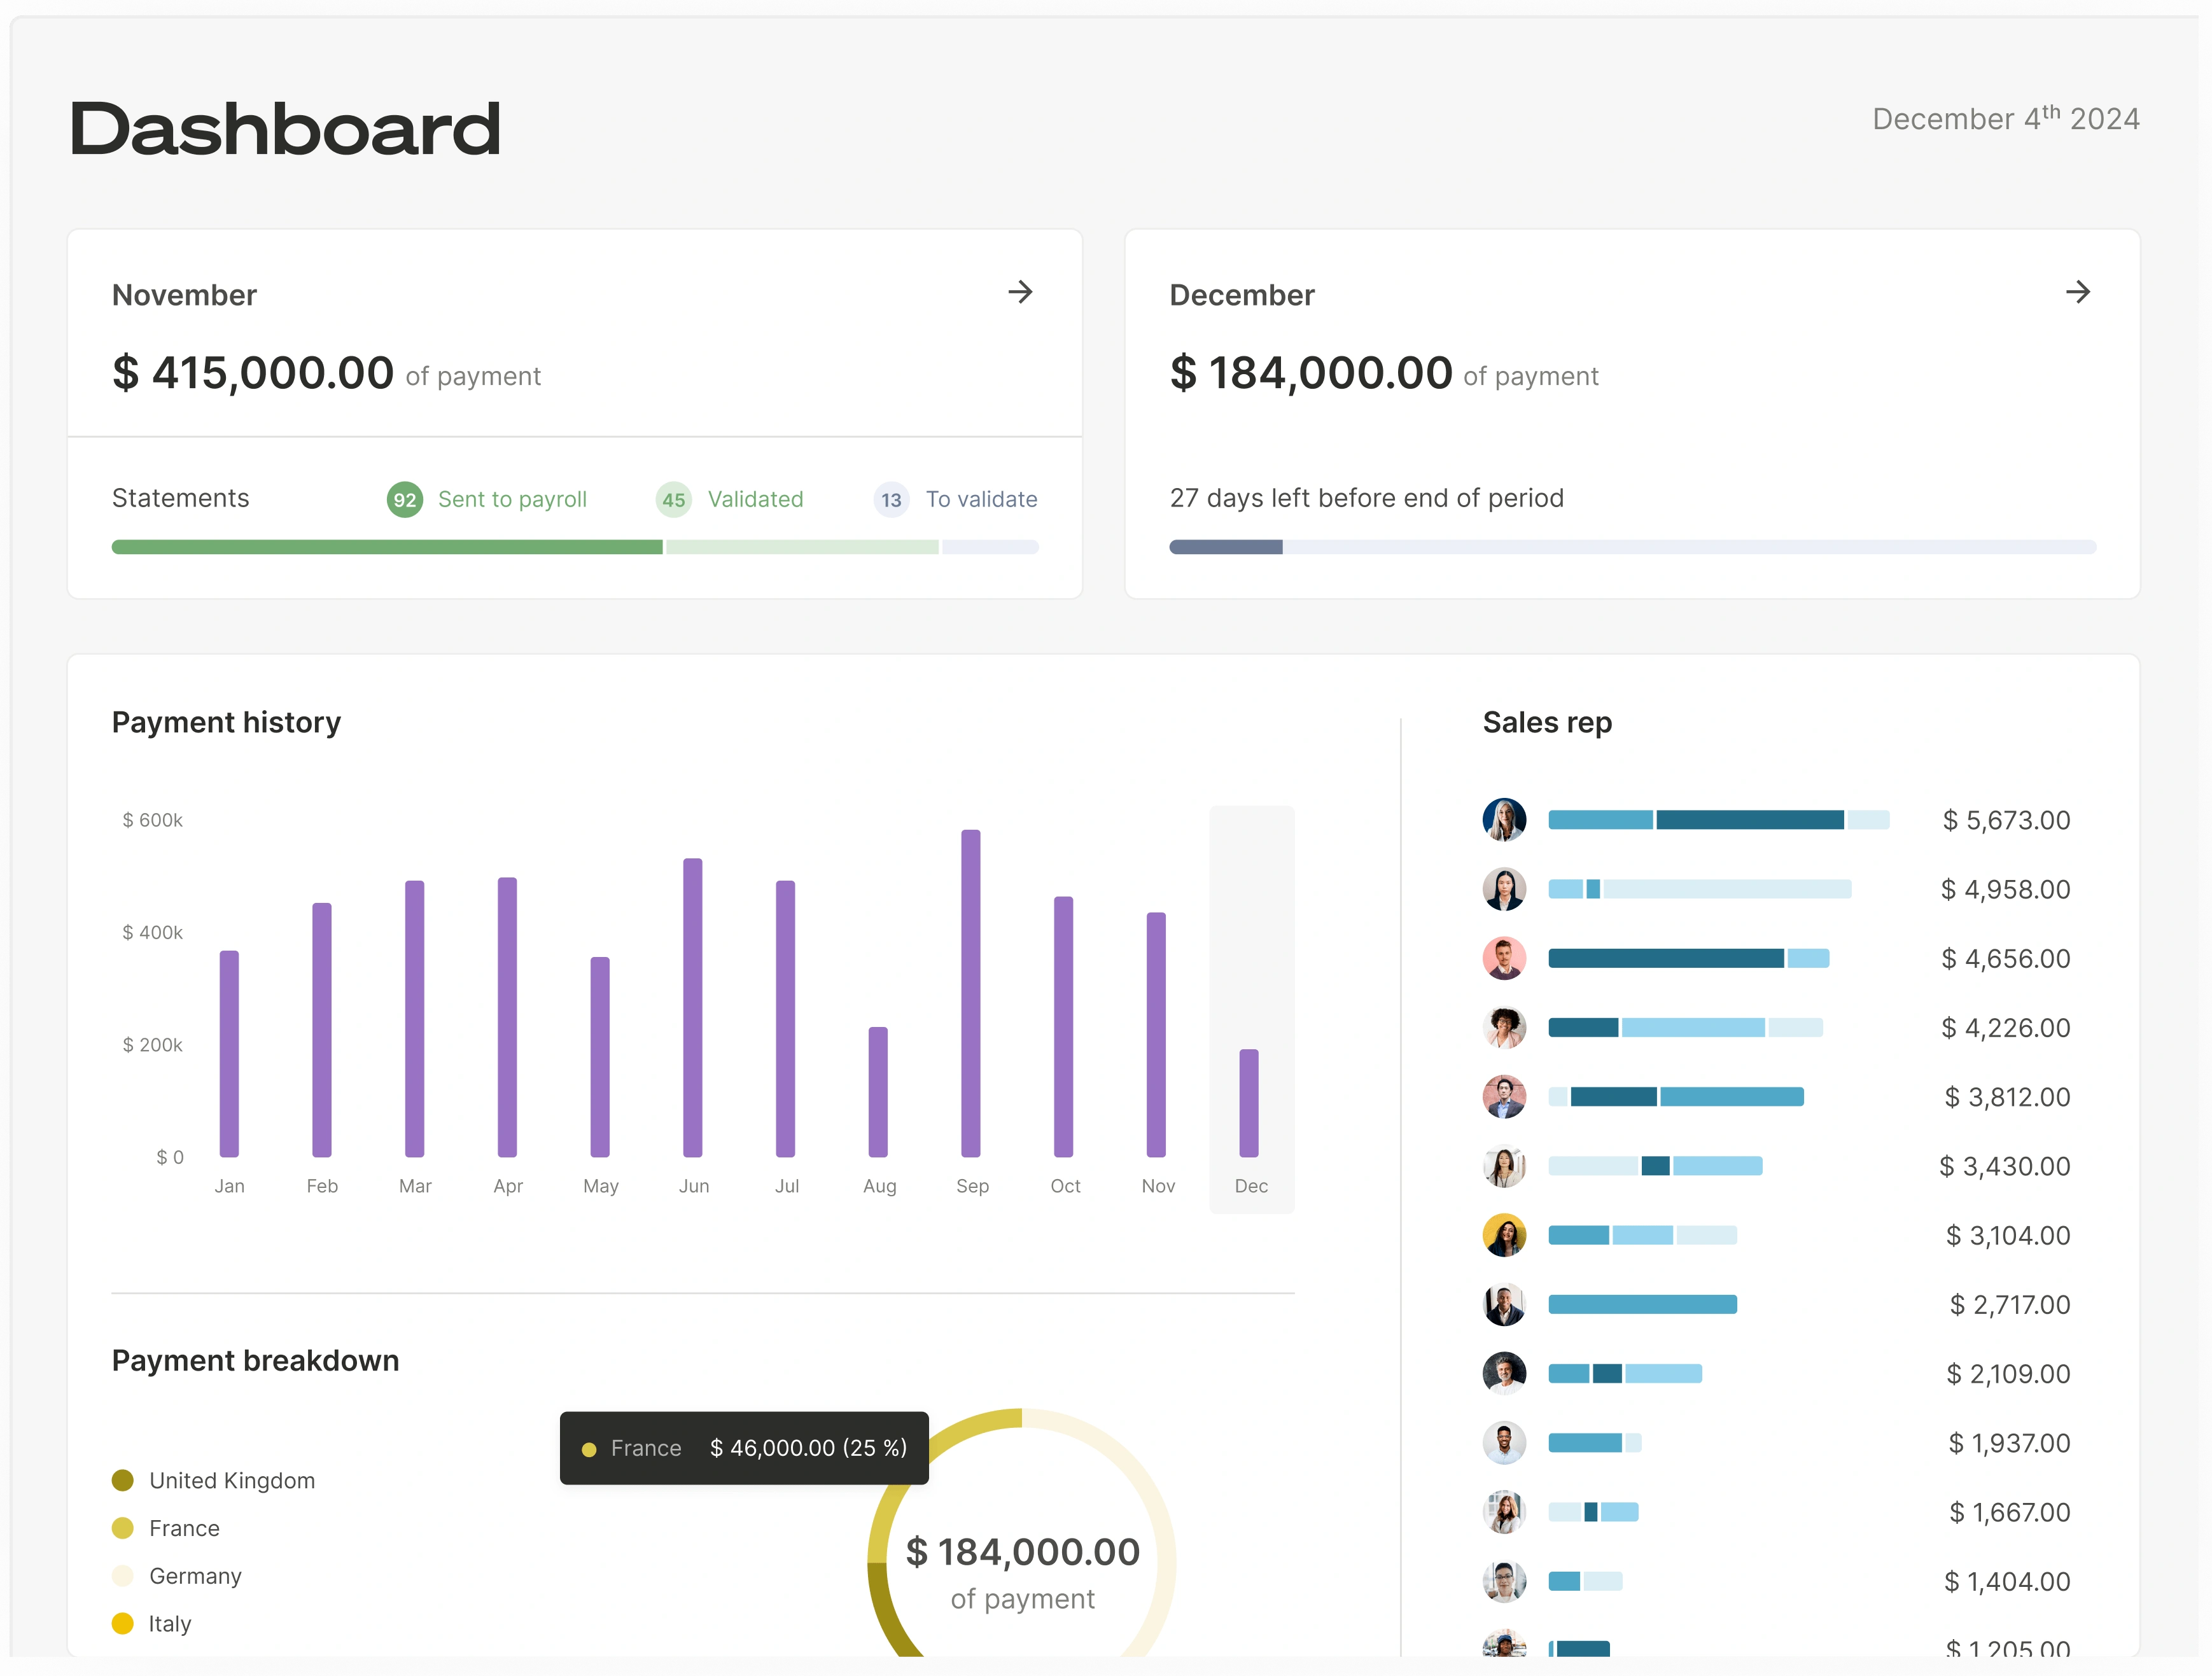
After diligently tagging transactions, you can run reports to see total sales for each representative. The two most useful reports are:
- Sales by Class Summary: This shows total sales attributed to each class (salesperson).
- Profit and Loss by Class: This provides a more detailed view, including revenue and associated costs for each class, which can be useful if you calculate commissions based on gross profit.
To run a report, simply type its name into the search bar at the top of the navigation menu and select it from the results. You can then set the date range to see the sales figures for the commission period.
Step 5: Manually Calculate and Record the Commission Payment
The report from QuickBooks only gives you the total sales amount. The actual calculation must be done outside of the software, typically in a spreadsheet.
- Export the Report: Export your "Sales by Class Summary" report to Excel or Google Sheets.
- Apply Commission Rates: In your spreadsheet, create formulas to apply the correct commission rate for each salesperson. This is where you'll handle any complexity like tiered rates or bonuses. Using a pre-built sales commission template can help structure this process.
- Record the Expense in QuickBooks: Once you have the final commission amount for each person, you must create a journal entry in QuickBooks to record the expense and the liability.
- Pay the Commission: When you pay the commission, you'll create a check, bill payment, or run it through payroll. This transaction will clear the liability.
Limitations of the Manual QuickBooks Method
While the Class Tracking method is a viable starting point for very small teams with simple commission plans, its limitations become apparent quickly:
- Highly Manual and Time-Consuming: The process involves multiple manual steps, from data entry on every transaction to external spreadsheet calculations and journal entries.
- Prone to Human Error: A single mistake in assigning a class can lead to incorrect payments and demotivated reps.
- Lacks Transparency: Salespeople have no visibility into their earnings until calculations are complete, leading to a disconnect between performance and reward.
- Doesn't Scale: This method is unmanageable for growing teams, complex commission plans with multiple tiers, or businesses needing detailed analytics.
If these challenges sound familiar, it’s time to consider a more powerful approach.
Method 2: Automating Commission Tracking with an Integrated Platform
The modern solution to the commission tracking challenge is to use a dedicated commission management platform that integrates directly with QuickBooks. These platforms act as a powerful middle layer, pulling data from your sources of truth (like a CRM), running complex calculations automatically, and then pushing the finalized accounting data back into QuickBooks.
As a leader in commission automation, we designed our platform at Qobra to eliminate the manual work and risks associated with spreadsheet-based or native QuickBooks methods.
How Automated Commission Software Works
Automated platforms fundamentally change how you manage commissions by connecting your entire GTM and financial tech stack.
- Seamless Data Integration: Instead of manual data entry, the software connects directly to your CRM (e.g., Salesforce, HubSpot) and other data sources. It automatically pulls in closed deals, contract values, and any other relevant data in real-time. This ensures that the basis for your calculations is always accurate and up-to-date.
- Flexible No-Code Calculation Engine: Forget complex spreadsheet formulas. With a visual, no-code rule builder, you can set up any commission plan imaginable—from simple percentages to multi-layered tiers, accelerators, bonuses, and spiffs. The engine recalculates earnings instantly whenever new data arrives.
- Real-Time Dashboards for Sales Teams: This is a game-changer for motivation. Salespeople get a personalized dashboard where they can see their current commissions, track progress toward quotas, and even simulate future earnings from their pipeline. This transparency turns compensation into a powerful daily motivator.
- Streamlined Validation and Accounting: Once commissions are calculated, finance and sales managers can review, adjust, and approve them through a structured workflow. The platform then generates the precise journal entries needed, which can be automatically synced to QuickBooks, ensuring your financial records are always accurate with zero manual entry.
Choosing the Right Commission Tracking Solution for QuickBooks
How do you decide whether to stick with the manual QuickBooks method or upgrade to an automated platform? The choice depends on your team's size, the complexity of your compensation plan, and your strategic goals.
For businesses that have outgrown spreadsheets and the manual QuickBooks workaround, investing in an automated solution delivers a powerful ROI by saving significant time and boosting sales performance.
While QuickBooks remains the cornerstone of your accounting, it shouldn't be a bottleneck for your sales compensation. By leveraging its native features for basic tracking or integrating it with a specialized platform for full automation, you can build a commission process that is accurate, efficient, and motivating for your entire team.
FAQ
Can QuickBooks automatically calculate sales commissions?
No, QuickBooks Online does not have a native feature to automatically calculate sales commissions based on rates or rules. It can only be used to track total sales by a salesperson (using Classes or Locations), which then must be exported for manual calculation.
What is the best way to pay commissions from QuickBooks?
For employees, commissions should be paid through QuickBooks Payroll to ensure proper income tax, Social Security, and Medicare withholdings are handled. For independent contractors, you can pay them by creating a bill and using the "Pay Bills" feature or by writing a check, mapping the expense to your "Commission Expense" account.
How do I handle commission adjustments or clawbacks in QuickBooks?
Commission adjustments or clawbacks require a manual journal entry. To reverse a previously accrued commission, you would create an entry that debits "Commissions Payable" and credits "Commission Expense." This reduces both the liability and the expense recognized in your books. Ensure you have a clear clawback policy in your sales commission agreement.
Is Class Tracking or Location Tracking better for salespeople?
Class Tracking is almost always the better option. It is more flexible and is designed for non-physical business segments like departments or, in this case, individual sales reps. Location Tracking should be reserved for its intended purpose: tracking financials for different physical business locations. Using it for reps can compromise the integrity of your geographical reporting.